
To access the "Your Details" page, select the orange "WP" logo at the top right of your WorkPal and choose "Preferences".

Select the "Your Details" tab on the ribbon to see all options that can be set for your WorkPal.
Right, let's get your WorkPal settings spruced up a bit. We'll make sure everything is clear and professional, so your invoices and communications are spot on.
Company Information Settings
Here’s a breakdown of the essential fields you’ll need to complete to ensure your WorkPal system is fully configured with your company's details.
-
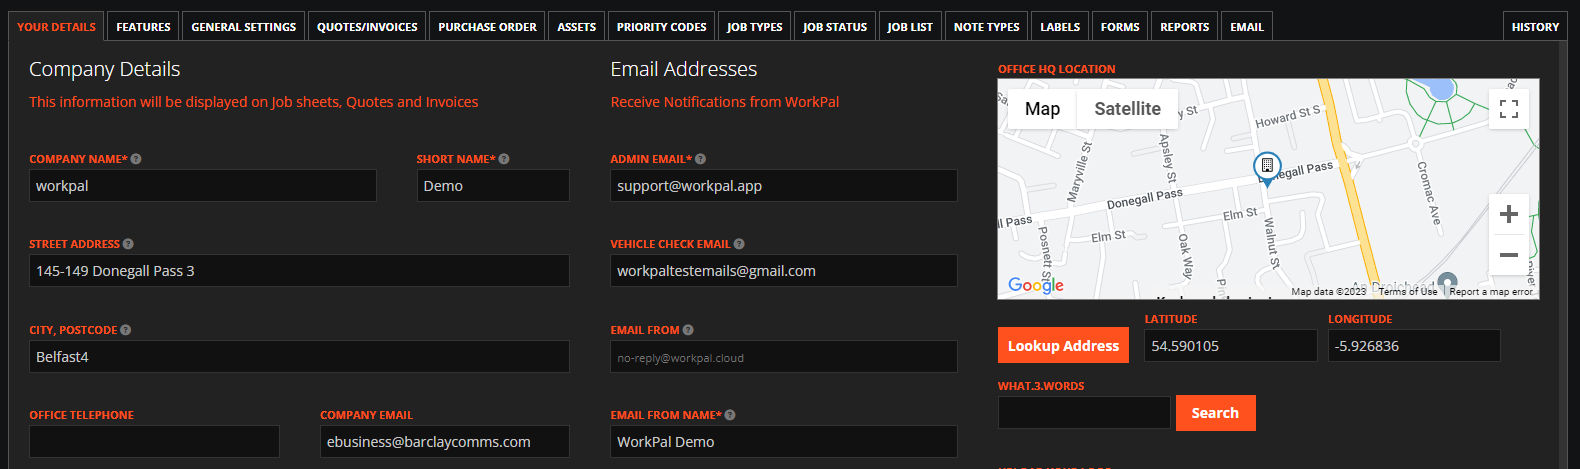
Company Name: Please provide the full, legal name of your company or business. This is crucial as it will appear on all your official documentation, including invoices, quotes, and other client-facing correspondence.
-
Short Name: This is a concise version of your company's name, primarily used for display within the WorkPal interface itself. You'll typically see this at the top left of your WorkPal screen for easy identification.
-
Contact Details:
- Street Address: Your full street address.
- City, Postcode: The city and postcode associated with your company's address.
- Company Email: Your primary public-facing email address.
- Website: Your company's official website address.
These details are vital as they will be displayed on all your outgoing quotes, invoices, and other official documents, ensuring your clients have all the necessary contact information.
Email Configuration
Proper email configuration is key for seamless communication and notifications within WorkPal.
-
Admin Email: This is the email address (or addresses) that will receive all WorkPal system notifications. If you need to send notifications to multiple recipients, simply enter each email address separated by a comma, with no spaces in between (e.g., admin@yourcompany.com,support@yourcompany.com).
-
Vehicle Check Email: Should a vehicle check fail, the notification will be sent directly to this designated email address.
-
Email From: This defines the email address that appears as the sender on all system-generated emails from WorkPal (e.g., noreply@clientdomain.com). It's generally best practice to use a 'no-reply' address here.
-
Email From Name: This is the name that will be displayed as the sender in the recipient's inbox for all system emails (e.g., 'Your Company Support' or 'WorkPal Notifications').
-
Completed Forms Email Address: If you wish to have all completed forms sent to a specific email address, enter it here. This field is optional.
-
BCC Email: All emails sent from WorkPal can be silently copied to this BCC (Blind Carbon Copy) email address. This is incredibly useful for record-keeping or for compliance purposes. As with the Admin Email, you can enter multiple addresses by separating them with a comma and no spaces.
-
Default Email Text: This is the pre-filled text that will appear in the body of emails generated by WorkPal. While there's a default, you'll always have the opportunity to modify this text in a prompt before the email is sent, giving you flexibility for individual communications.
Location and Logo
Getting your location pinned down and your logo uploaded ensures your professional identity is well-represented.
-
Address Lookup: Once you've entered your full address details in the relevant fields, click the "Lookup Address" button. This clever feature will pinpoint your exact location on a map, and it will also automatically generate a "what3words" address along with the precise longitude and latitude coordinates for that location.
-
Upload Logo: To brand your WorkPal documents, click the "Browse" button to select your company logo image file from your computer. After choosing the file, simply click "Upload" to add it to your WorkPal profile. This logo will then be displayed on your invoices, quotes, and other professional documents.