
To tailor your asset preferences, simply navigate to the 'WP' button located in the top right corner of your screen and select the 'Preferences' page. From there, choose 'Assets', and you'll discover a range of customisable options.
You can easily enable or disable the following features using the available dropdown menus:
-
All Assets on New Jobs: This handy option automatically links all existing assets at a specific site to any new job created for that location.
-
Servicing Assets: Activate this to enable asset servicing functionality. Assets can then be manually marked as 'Serviced' during a job, or they can be automatically updated upon scanning their barcode.
-
Batch Servicing Assets: This feature allows you to select multiple assets and mark them as 'Serviced' all at once, saving you time and effort.
-
Show Service History: When viewing an asset, this option displays a comprehensive list of all previously completed 'Service History' forms, providing a clear overview of past work.
-
Barcode Scanning: Enable this to allow users to efficiently scan asset barcodes.
-
Images on Assets: This lets you attach photos directly to a specific asset. These images are then saved with the asset, making it simple for users to review existing photos from previous services.
-
Parts on Assets: If you prefer to log parts against the asset itself rather than the job, enabling this ensures users have a complete history of parts used on that particular asset.
-
Documents on Assets: This is incredibly useful for attaching certificates or other important documents directly to an asset.
-
Service History: This provides a clear rundown of all services previously completed on an asset before the current visit.

Barcode Scanning for Efficient Asset Management
Barcode and QR code scanning in WorkPal offers a swift and efficient way to manage your assets. By assigning a unique barcode or QR code to an asset, mobile users can simply scan it within the WorkPal application to instantly access relevant asset data.
WorkPal provides a range of customisable actions upon scanning an existing asset, selectable from the 'Scanning Action' dropdown menu:

-
View Asset Information: This option directs the mobile user to the dedicated Asset screen, where they can readily review all asset details, including its service history and other pertinent information.
-
Open Service Form: Selecting this will automatically open the default Asset service form, enabling the mobile user to promptly input and update asset service data.
-
Automatically Service Asset: For maximum efficiency, this action automatically marks the scanned asset as 'serviced', streamlining routine tasks.
Furthermore, WorkPal offers enhanced flexibility. Should a mobile user scan a QR code or a Barcode that isn't yet linked to existing asset data within the system, WorkPal allows them to seamlessly add a new asset to the site. This functionality is particularly beneficial for installation or replacement jobs, ensuring accurate asset tracking from the outset.
Please note: You will need to source and provide the physical barcodes or QR codes yourselves. Various online services are available to assist with their generation.
For more information on how to set up Asset Scanning, please see our guide on this topic.
Customisable Asset Fields
Editing ‘Asset Fields Configuration’ allows a Desktop User to add additional fields within an Asset. These fields are fully customisable and can relate to any data that you want to record against a specific Asset.
A few typical examples include: Date of manufacture, Make, Model, Serial Number, etc., but these fields can be configured to your needs. WorkPal can store up to 50 customisable fields against a particular Asset.
Adding an Asset Field
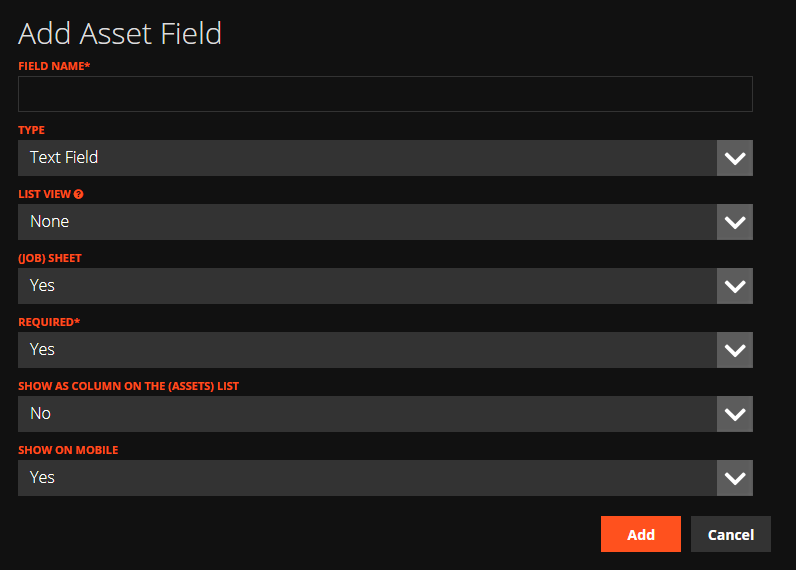
When adding an Asset field you have a list of options.
Customising Your Asset Fields in WorkPal
When setting up your assets in WorkPal, you have complete control over the information you want to track. The field name is essentially what your asset will be called within the system; think of it as the label for a specific piece of information, such as "Model," "Serial No.," or "Tank Capacity."
You can also specify the type of information that's permitted in each field using the 'type' box. Here are the available options:
- Text Field: Perfect for any plain text information.
- Date: This field is designed to hold date data only, like
01-07-2021. - Time: Use this for time data exclusively, for example,
15:39. - Date & Time: When you need to capture both, this option allows for entries such as
01-07-2021 &15:39. - Drop-down List: This is ideal for creating a fixed set of selectable options, ensuring consistency.
- Number Only: As the name suggests, this field accepts only numerical data.
- Checkbox: Great for 'true' or 'false' data, where the option is either checked or unchecked.
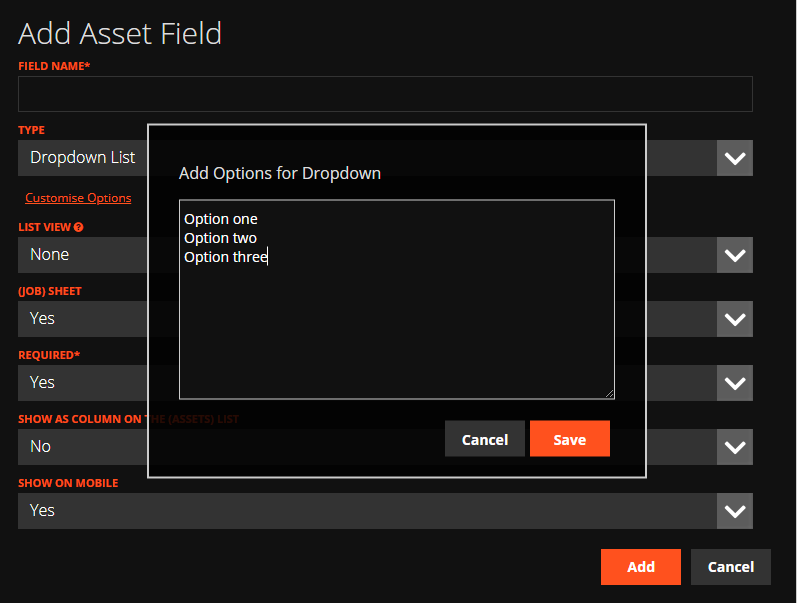
Setting Up Drop-down Lists
If you choose the 'Dropdown List' option, you can easily create a predefined list of selections for a specific asset field. Simply select 'Dropdown list', then click on 'Customise options' and input your desired choices as a list.
For instance, if you're tracking the 'Status' of an asset, your dropdown options might look like this:
- Active
- In Maintenance
- Retired
This ensures that users can only select from a predefined set of statuses, making your data clean and consistent.
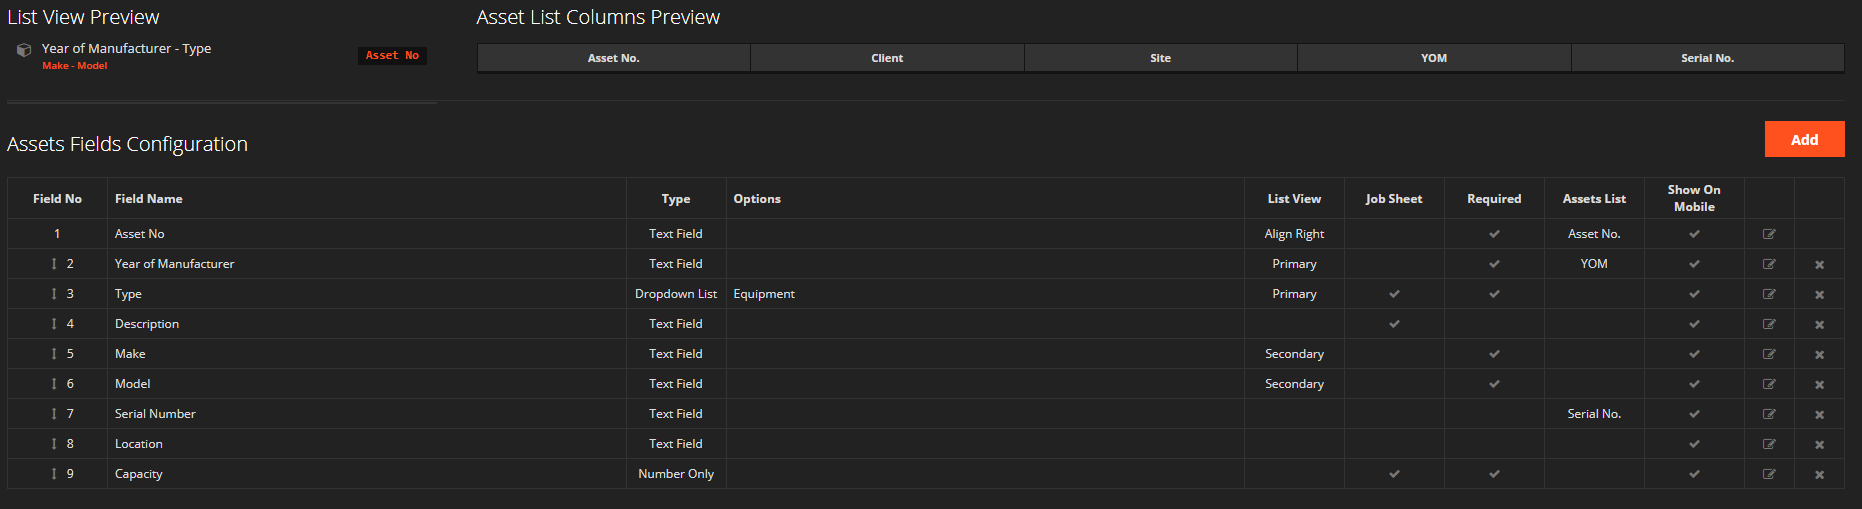
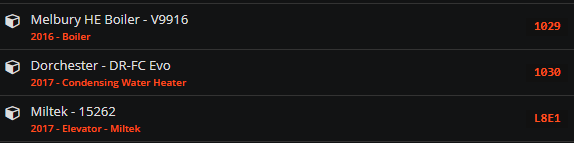
The List View refers to how you would like these Assets to be displayed in the Assets section on a Site or Job. Primary asset fields are shown on the top line in white; Secondary asset fields are shown on the bottom line in orange. The asset number is set to Right Align by default. These can be configured to your requirements.
You can choose to show or hide an asset field on the job sheet by selecting Yes or No in the (Job) Sheet option.
You can choose to force an asset field to be required by selecting Yes or No in the Required option.
If the fields you have included are important and you would like to view this information at a glance, you can add these fields to the columns on the Asset list, by selecting Show as Column on the (Assets) List.
You can choose to show or hide an asset field on the mobile device by selecting Yes or No in the Show on Mobile option.